
Our tried and tested WordPress Website Installation Process will help get your website up and running with the optimal settings for website success.
This post outlines our step-by-step process for setting up a new domain, web hosting, and WordPress website installation.
It’s a helpful guide to ensure a correct and smooth website setup process to get ready for the development of your website.
For the purpose of this blog post, we’ve included the web hosting account setup with Xneelo web hosting on a dedicated managed server:
Domain & Web Hosting Setup:
- Login to our server and click on our server:
- Click on our server.
- Click Add new hosting plan
- Register or connect domain
PHP Config Edits:
- Once the web hosting package has been setup, go to our server
- Click on the domain of the website we are developing:

- Go to PHP Config settings:

- Update to the following PHP Config settings for optimal performance and functionality of the WordPress theme and plugins, the following PHP configuration settings are recommended:
- PHP Version: 8.2 or higher
- upload_max_filesize: 32Mb or greater.
- max_input_vars: 3500.
- post_max_size: 36M or greater.
- max_execution_time: 150 or greater.
- memory_limit: 256M or greater.
- PHP Version: 8.2 or higher
WordPress Installation:
- Once the web hosting package has been setup, go to our server
- Click on the domain of the website we are developing
- Go to WordPress App Installer

- Install WordPress
- Setup WordPress (Go through steps)
– Select correct country (eg. English South Africa for South African businesses)
WordPress Settings Adjustments:
The next part of our WordPress website installation process is to adjust the WordPress settings:
- Delete default plugins
- Delete default sample page (empty trash)
- Delete default posts (empty trash)
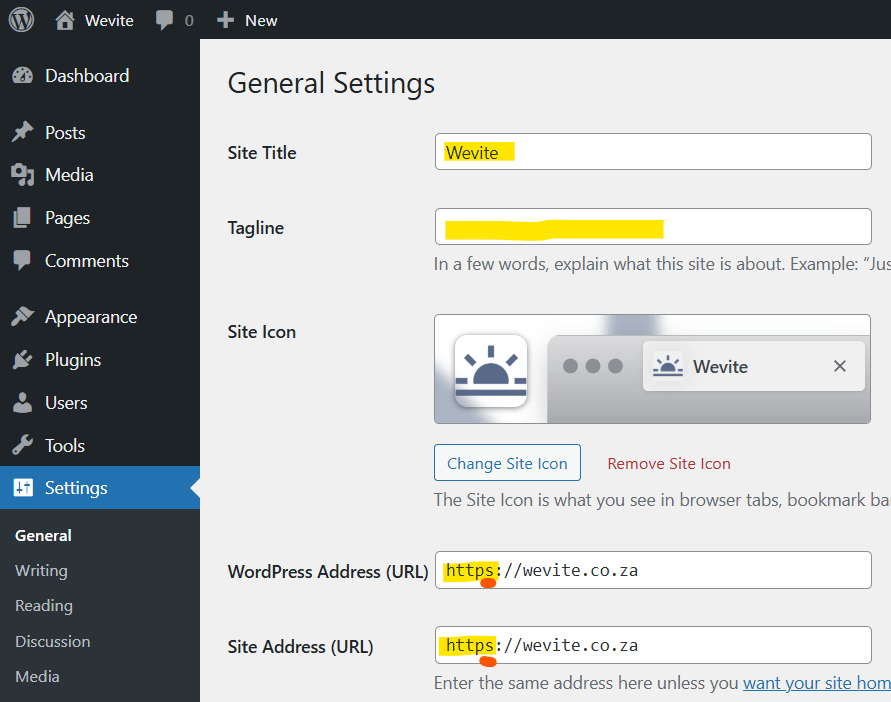
- Add site title, tagline, icon, and ensure website is https instead of http (by default):
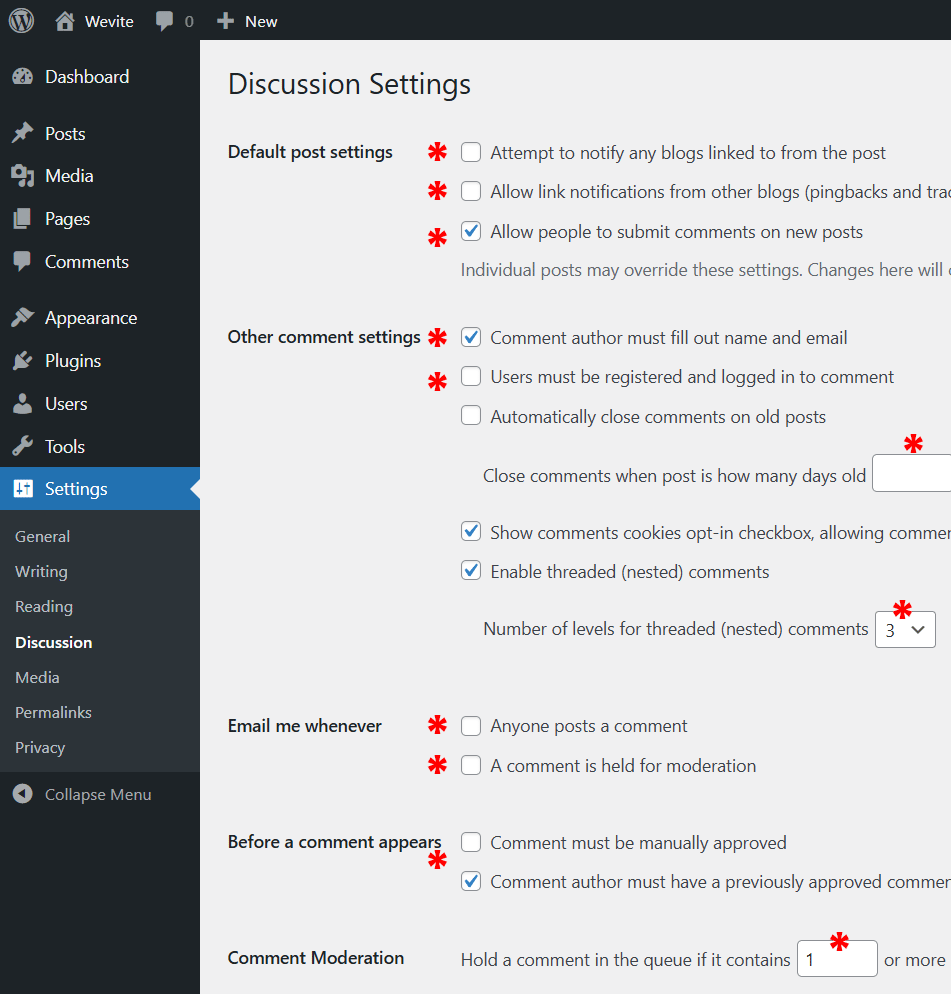
- Edit discussion settings to match the following:
- Set permalink structure to the following:
")
- Delete default themes except for the latest default WordPress theme. Enable auto updates on the latest WordPress theme.
Install and Configure Plugins:
- Admin and Site Enhancements (ASE) by Bowo (currently testing)
If this plugin works, it can reduce the need to install many individual plugins without impacting site performance. - Maintenance by Web Factory
- Envato theme (download latest plugin version here)
Once activated, go to the evanto settings page and generate an Envato API Personal Token to access our premium theme licenses. - Advanced Editor Tools (optional)
- Classic Editor (optional)
- UpdraftPlus – Backup/Restore by David Anderson / Team Updraft
- WPForms – Easy Form Builder for WordPress
(If the project requires advanced form functionality, you can download and install the premium plugin for which we have an elite unlimited license.) - WP Mail SMTP by Syed Balkhi (optional to improve email deliverability from website to users)
- Disable Comments by WPDeveloper (if blog post comments are not desired)
- Duplicate Page by mndpsingh287
- WPS Hide Login by Remy Perona
Set WP login page URL to something hard to guess. Email support@weaverbird.co.za for the URL we normally use.
Install and Configure Theme:
- Go to the Envato plugin settings
- Install one of our premium themes (we mostly use Salient theme for most websites)
- Install and activate required theme plugins. Only install plugins required for the specific project.
- Add the following to the theme’s custom CSS panel:
/*——————- Standard CSS Elements ——————*/
/*———————– Custom Styles ————————-*/
/*————————- Menu / Nav ————————*/
/*—————— Salient Theme Modules ——————–*/
/* ————————– Buttons —————————- */
/* ————————– Portfolio ————————— */
/* —————————- Blog —————————– */
/* —————————- Form —————————- */
/* ————————— Footer —————————- */
/*—————————- Tables —————————-*/
/* ———————- Notification Bar ———————- */
Final steps:
Double check that the coming soon page is active.
Finished with the WordPress Website Installation Process?
Ready to move on to the next step? Start with the perfect home page web design:
Crafting the Perfect Homepage: Our Proven Home Page Web Design Template